It’s been a busy October, riddled with costumes, work and sickness. Mainly costumes – there will be pictures in the near future! (and hopefully regular blog posts). I hope everybody has a fun and spooky (and safe) Hallowe’en!

In between Tasty Planet 2 work and wedding preparations and site development and story building and a hole slew of other things that will eventually get finished (siiigh), I’ve been helping my brother in law with some costume construction. He really gets into Halloween like me and my husband, and this year he decided he wanted a head cast so he could sculpt all kinds of masks and prosthetic pieces. The whole family pitched in and helped.
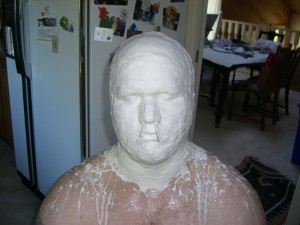
Doing a life cast is a whole lot easier with three additional pairs of hands. We changed how we did a few things – when prepping the mold for the ultra cal, we bound the old together with a few plaster bandages down the seam AND wrapped it duct tape,and my brother concocted a different type of stand for the ultra cal cast.
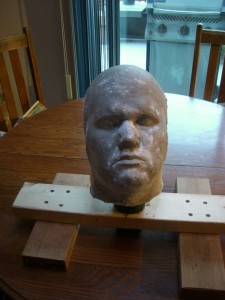
It’s definitely not a process for the faint of heart – stick to buying an armature head or a foam head if you’re a bit claustrophobic. Or have problems breathing. Or if you have an allergy to vaseline. Please, be really careful if you do attempt a head cast (especially if you go the straws-in-nose method). For more in-progress shots, check out this.

A Star Trek convention was in town, and needless to say, my husband and I were pretty ecstatic about it. William Shatner and Leonard Nimoy were both going to be at the Vancouver con on Sunday, so we decided to dress up and boldly go where we had never gone before! James already had a beautifully constructed captain’s jacket, made by my mom about five years ago, so he and I put together the rest of a Next Generation outfit for him. I decided to go with a original series dress (skant), complete with a tricorder purse and mile-high hair.
I think I was hitting 6’4” from heel to hair.
We had a blast; it was one of the smaller conventions we went to, but I liked how it was intimate, and everyone was really nice (and impressed with our costumes!). We got to see/listen to some fantastic writers and actors. I hope it comes back next year.
Sadly, our camera stopped working after the convention – we tried to upload our photos, but all of our images were corrupted. We tried ever photo-recovery-repair program there is, but only a few pictures were able to be saved (the photo I used in this post isn’t even one of ours, a friend took it). Feel free to check out (low quality) images of my costume on my cosplay page, or to read up on how I made the tricorder bag on a craftster post.
Going to a Sci-Fi convention was also very inspiring and appropriate for current game levels I am working on… 🙂
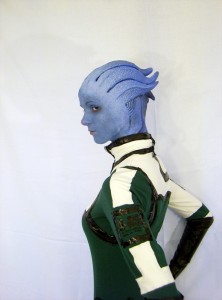
Well, I’ve finally got decent photos of my Liara T’soni costume and/or cosplay taken. It’s all there for you and the internets to see right here.
It’s been a fun journey. We’ve learned and grown, experienced both pain and happiness. Is this the end of Liara? Most likely. I can’t stand doing the makeup – I didn’t even do all the makeup for these photos (I just painted my face blue and I quickly tried to photoshop out the seams. I mean, really quickly). I have to thank my husband for all his patience and skills, for the times when he was applying liquid latex to my skin, to the times when he just smiles and agrees to take my silly little photos.

Image from firmdragon.blogspot.com. That there is the old headpiece back in th’day. Sigh.
This costume, in ‘real life’ and online, has gotten a lot of puzzled looks. Some have sneered, others have ignored, and then there are those that laugh and smile. And that’s part of the reason why I do what I do.
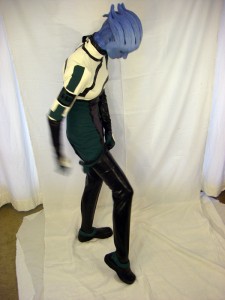
…I don’t think that title makes sense, but I was trying to be funny. Punny? Yes, yes, thank you for the groans and sneers. While my Mass Effect costume wearing days are slim and few, every-so-often I keep getting emails about Liara’s ensemble, from the headpiece to the uniform. The latex mask headpiece thing tutorial is yours to use (and it works!) but recently I came across a *great* tutorial, that I would have killed for back in the day. Make sure to check it out. This guy’s work is stellar; he’s a pro. He actually IS a pro! He knows what he’s doing and livin’ by it!
As for the outfit Liara wears – I will explain, in this very lengthy very un-fun post, how I (with the mom-in-law) made my costume. I’m not sure how much sewing experience you have, and I don’t know much sewing terminology, but hopefully this wordy tutorial will help! I’ll say in advance that it helps to have someone helping you make something stretchy and fitted, for making adjustments, making marks when on the body, and it’s always good to have someone with sewing experience to ask for advice!
SO
The best thing that you can do is to do get a big folder of references (get some screen captures of the game, go online for wallpapers or screen shots, check out youtube for video moments, etc) and note down the proportions and details. Sketch out the outfit, so you have an idea of what’s going where and what pieces you’ll need. Don’t feel bad if you can’t draw – these sketches aren’t for the world to see, they’re for your own reference!Look, I’ll even post my horrible sketches for you to laugh at.
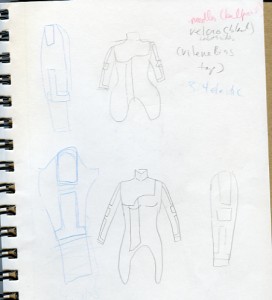
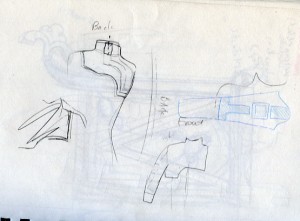
See? You can’t get crappier than that. I even have a little shopping list written on the one! You don’t need to do sketches, (I didn’t bother sketching out shorts) I just think they’re a good idea. I think you can even find body templates online that you can download and draw clothing onto. I brought this with me when I went material shopping, and also some reference pictures. Hmm I never did get those sewing needles.
The clothing items that I actually made were the long top, the pants/shorts, and the little green gloves (that go over the black latex gloves), plus I modified some shoes.
I used 4-way stretch material for the top and shorts. I think the green (used for the top, shoes, and gloves) and grey (shorts and stripe) were a 4-way knit, and the white was…something like a 4-way knit. The white was a bit shear, so I had to end up doubling up the material. The black shiny material used for the detail had just a tiny bit of 2-way stretch in it – if you can, try to find a PVC like material that has a good amount of stretch to it, otherwise you might run into fitting problems. The black stuff I used was stretchy enough for me to wear without the black stretching and ripping, but I had to modify the collar – the outfit features two black stripes going down the front and back of the collar, so I had to Velcro those on, otherwise I couldn’t get the turtleneck over my head.
For each shoe, I sewed a long narrow tube, turned that inside out and hot-glued it around the top of the shoe. I tried sewing it on, but the needle wouldn’t go through the shoe material.
For the gloves, I read up on how to make gloves annnnnd decided that since this was a almost a fingerless costume glove, to do the simplest version possible without all the gussets. I just traced my hand onto some craft paper, drew on seam allowance, and use that as a pattern. I cut the pattern out of the green material and, after free-handing a pattern based on the black and white parts of the glove, sewed on the shiny black ‘wave’ glove pieces, and the white ‘0.’
For the shorts, you can use a bike-short pattern. I couldn’t find one – so I ended up using a swim-short pattern. I measured the circumference of my leg just above the knee and the length from my knee to hip. After measuring the length of the given pattern, I extended the pattern piece to go just above my knee. A bike short pattern would work best (it would likely be the right length too) but since none was to be had, I used McCall’s pattern #3566.
For the shirt, I used Burda 7742 – but any pattern for a stretch turtleneck will do. Or if you can find a pattern for a mid-thigh length stretchy turtleneck dress, even better (you’ll end up skipping a step or so). I wish I had illustrations to help explain what I’ll say next – buuuut I’m too busy to make a comic tutorial. Liara’s outfit is divided into white and green pieces (with black details). I first extended the pattern so the bottom of the shirt came to just beyond my mid thigh. I then drew, right onto the pattern, the outline of the different sections of white and green. I traced the white pieces onto another sheet of paper, and then drew seam allowance onto both patterns. I then cut out the white pieces with their seam allowance, and the green pieces with their seam allowance. I then sewed pieces together that would help make one piece ‘whole’ before starting to sew the actual top (ie. sewed some green to white in order to make a Front piece, sewed some green to white to make one half of a Sleeve, then when you have the Front, Back and Sleeve Pieces completed, then you can start sewing the top as indicated in the Burda instructions). I sewed the black shiny detail pieces onto the top after I had sewn everything together, but I think it would be better to do this before sewing the sleeves to the front and back (with the exception of the black detail needed to go over the grey stripe and the bottom edges, that should be sewn on later).
After sewing the top together, try it on, and you should have a fitted short dress. Making sure it fits right, you can then either draw (with chalk, or if you’re brave, a marker) onto the dress itself, or draw a pattern, of the upside-down ‘U’s that needed to be cut out of the front and back. I did this after I tried the dress on, instead of just cutting out the U at the start, because I wanted to make sure the top would fit me correctly, and I wanted to see how the dress would hang so I would know where to put the ‘U.’ After making my final decision on where the upside-down ‘U’s would go, I cut ’em out, and hemmed the bottom. I then appliqued on a grey stripe, and sewed the black stripes on (I was able to use the white and green pattern pieces to make these).
And…voila! Liara T’soni (Mass Effect 1) outfit! Sorta explained in a long lengthy boring way! Remember, the most important things you need for making a costume…is time and patience. And yes, I have started preparations for Halloween this year.
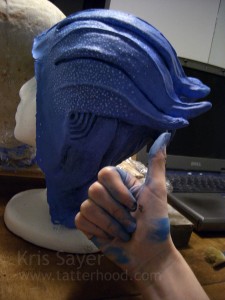
(a big thumbs up to a guy out there at PAX who said he liked my Asari ‘gettup’ – I was caught in the rain on the last day of PAX and one of my bags were soaked through so I had my Asari head lying upside down on a plastic bag along with various other items, letting them dry out. It felt really awesome to have someone recognize what the headpiece was, even without it being right-side up or with me wearing it and the rest of the costume. PAX proved again to be awesome in every way!)